Earlier this decade when I was getting more into photography as a hobby, I frequently took my Holga camera on my travels and decided after a few trips that it was worth learning how to develop my own black and white film. The reasons for this were cost and convenience; getting B&W negatives professionally developed is both expensive (it was at least $10 per roll 10 years ago and probably more now) and time consuming. I’d typically wait about 2 weeks to get my film back. I did some research about the B&W development process and it looked like something I could figure out with a little practice. So I got online, bought up a few supplies, and quickly learned how to develop my own film.
It was easier than I thought it would be. And very satisfying.
I’ve split this topic into two posts. Today I’ll be talking about supplies needed and a general overview, and next week I’ll go over the technique from start to finish.
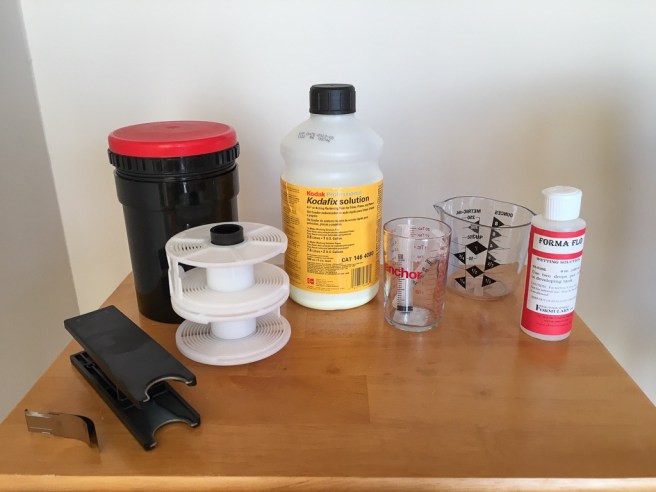
First of all, you do not need a darkroom with the cool red lights to do this. That’s where prints are made, which isn’t what we’re doing. To get your film from your camera to a usable, stable negative, you only need the following items:
- A completely dark room with no stray light. It can be something small like a closet.
- If you don’t have access to a light tight room, then they sell something called a Film Changing Bag which accomplishes the same goal.
- A developing tank. This Paterson Tank was the one I used for many years. This is the thing that mixes the film and all the chemicals to make the magic happen.
- Film cassette opener if you’re shooting 35 mm film. If you’re shooting anything larger like medium format, then you don’t need this tool.
- Some chemicals, all of which can be bought online. The bare minimum of what you need is a developer and a fixer (specific recommendations later).
- Two optional chemicals are a stop bath & wetting agent. More on this later.
- A digital thermometer
- A few big plastic cups to mix your chemicals. I saved a few large plastic Subway cups from my lunches, and those were the perfect size.
- A few plastic medical syringes in various sizes: 3 mL, 5 mL, and 10 mL. These are useful to mix up your developer.
- A 250 mL glass beaker.
- A plastic funnel
- 1 big bottle of peroxide with the peroxide poured out. In the US, these come in a tall brown bottle measuring 32 oz. You want the bottle, not the peroxide, so if you can find a similar sized bottle, then that’s fine.
- A clothes hanger and a plastic clip (like the ones for half eaten potato chip bags) to hang your film
- Some sort of timer. The one on your phone is perfect.
All of the photography specific equipment and chemicals listed above can be purchased online at bhphotovideo.com. Once you buy the chemicals, they’ll last you quite a while.
More on Chemicals:
To start with, there are only 2 chemicals you require: a developer and a fixer. The developer develops your film, and the fixer stabilizes the final image so your film doesn’t keep absorbing light when it’s taken out of the developing tank.
My favorite developer is Kodak HC-110. It comes as a syrup concentrate, meaning you mix it with water to dilute it before using. I like HC-110 because it’s easy to work with and has a long shelf life. I’ve used the same concentrate for several years with no ill effects. You can dilute it several different ways; the higher concentration of syrup, the shorter the developing time.
My preferred mix is dilution E, which is 1 part syrup to 47 parts water. To make the math easier, I did a 1:50 ratio. It’s close enough. For the 400 speed films that I used (mostly Ilford HP5+), this resulted in a developing time of 7.5 minutes at 68 degrees Fahrenheit.
The Paterson tank holds about 600 mL of fluid, so to fill it up at the proper 1:50 ratio, you would need 12 mL of HC-110 syrup and 600 mL of water. This step is where the plastic syringe and glass measuring beaker come in handy to make sure your proportions are exact.
I like this dilution because the developing time is long enough to leave a margin of error in case you accidentally run a little long, but it’s not so long that you’re sitting there waiting forever for your film to develop. Here’s a really helpful link with information about HC-110 dilutions and all the variations available for a number of film brands.
Developer is only used once, so I use a large fast food plastic cup to mix and temporarily hold my developer solution. Used developer can be conveniently discarded down the drain.
For your Fixer, you can go with any brand. Two popular ones are Ilford Rapid Fixer and Kodak Fixer. All these pretty much do the same thing so just buy whatever. Fixer can be used several times before discarding it, so this is the purpose of the big bottle of peroxide listed earlier. Pour out the peroxide, rinse it really well, pour in your fixer solution and now you have an easily accessible fixer mix that can be used at least half a dozen times. I placed a piece of masking tape on the bottle to write hashmarks showing how many times the fixer has been used.
Unlike developer, you’re technically not supposed to pour used fixer down the drain due to its silver content. Realistically, unless you’re running a commercial lab and going through massive volumes of fixer, it’s probably not that significant, but you can Google proper methods of fixer disposal if you want to be environmentally friendly.
Temperature concerns:
For the developer to work properly, temperature is crucial. Most published developing times assume a water temperature of 68F = 20C. If you’re developing your film in a climate controlled environment, then your actual water temperature is likely within 5 to 10 degrees F of this. Prior to adding your developer syrup, you can find a way to adjust your water temperature to exactly 68 degrees by adding small amounts of either cold or hot water. Or even easier, you can use this handy calculator to determine how much to adjust your development time based on the current temperature of your water. The warmer the water, the shorter the development time, so be aware of that. I would recommend keeping your temperature within 5 degrees of 68F to keep your developing time in a reasonable range.
The temperature of the fixer and water that you use for the various rinses is not nearly as important as the temperature of the developer, so if everything other than the developer is off by a few degrees it shouldn’t make any significant difference. But make sure you know the exact temperature of your developing solution, otherwise it won’t turn out right.
So we’ve now got our chemicals prepared at the proper temperature and calculated our developing time. In next week’s post, I’ll go over how to get the film into the developing tank, then go step by step into my own personalized process for getting a successful final product.
